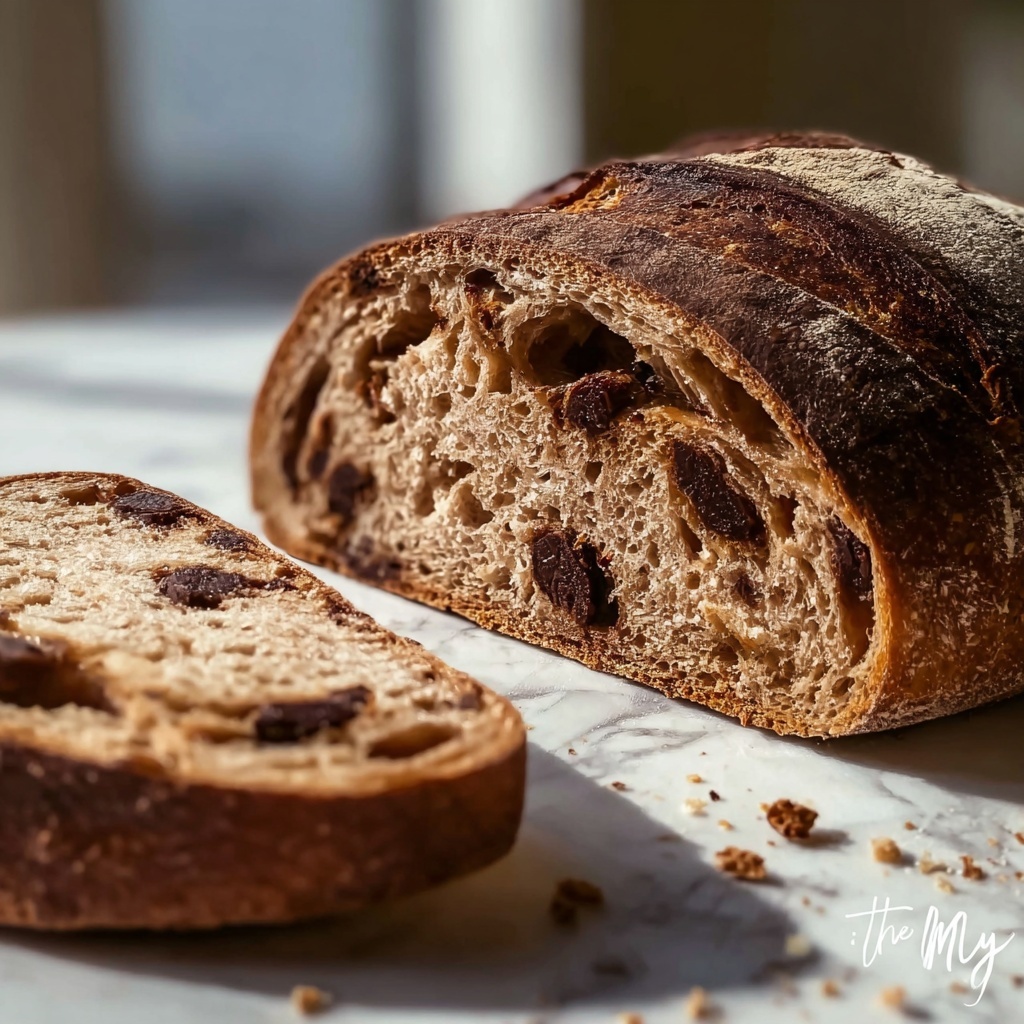
If you’re looking to elevate your weekend baking game, there’s nothing quite like this Chocolate Sourdough Bread: An Insanely Good Weekend Treat Recipe to win your heart (and taste buds) over. Picture a crusty artisan loaf boasting a tender crumb infused with rich cocoa, pockets of melted dark chocolate, and just the right hint of espresso and vanilla to deepen every bite—this is sourdough done decadently right. Beyond just a bread, it’s a slow-baked joy that promises to turn your kitchen into a cozy haven and your gatherings into memorable feasts. Ready to dive into a baking journey that’s as rewarding as the final slice? Let’s get started!
Ingredients You’ll Need
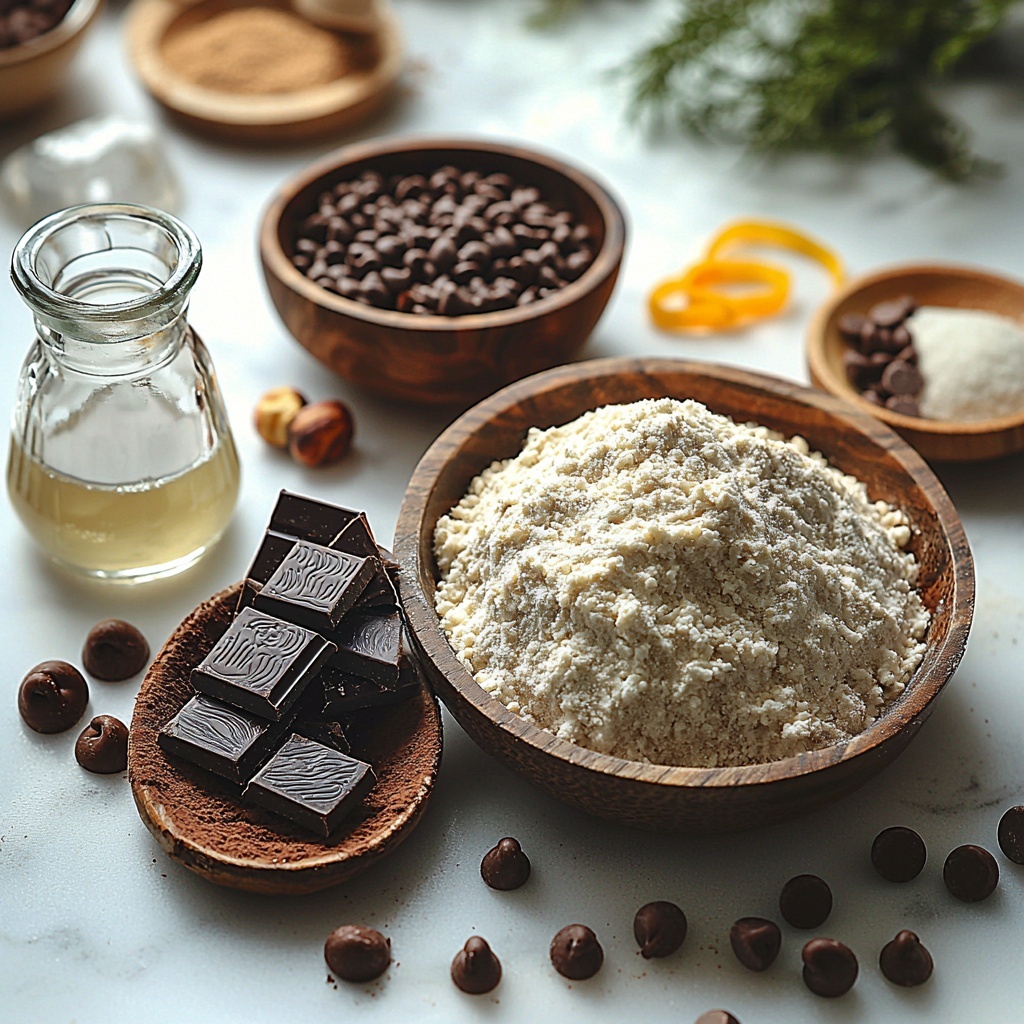
Don’t let the rich complexity fool you; this recipe relies on simple, quality ingredients that each play a vital role in building texture, flavor, and that irresistible chocolatey essence. From the sturdy bread flour that creates perfect structure to the little pinch of espresso powder that lifts the chocolate’s depth, every ingredient counts.
- Active (bubbly sourdough starter): Make sure it’s recently fed and at its peak to create the perfect rise and subtle tang.
- High-protein bread flour: Provides the necessary gluten strength to support the chewy crumb and hold the chocolate pieces in place.
- Unsweetened cocoa powder: Use a good-quality natural or Dutch-processed cocoa which delivers that rich, deep chocolate flavor that transforms this bread.
- Dark chocolate chips or chunks: These add delightful bursts of melty chocolate pockets throughout the loaf.
- Warm water: Slightly warmed to activate the starter and blend the dough smoothly without hurting the yeast.
- Fine sea salt: Not just for seasoning, it balances flavor and brings out the chocolate’s complexity.
- Brown sugar or granulated sugar: Just a touch to soften cocoa’s natural bitterness and add a gentle sweetness without making it taste like cake.
- Espresso powder: A subtle enhancer that deepens the chocolate notes, adding a sophisticated edge.
- Vanilla extract or orange zest: Provides a warm or bright accent, elevating the flavor profile in a delightful way.
- Nuts or dried fruit (optional): Chopped hazelnuts are great for extra crunch and nuttiness if you like a bit of textural variety.
How to Make Chocolate Sourdough Bread: An Insanely Good Weekend Treat Recipe
Step 1: Feed and Prepare Your Starter
This step is non-negotiable when it comes to achieving a beautiful rise and those signature airy pockets. Refresh your sourdough starter 4 to 8 hours before beginning, keeping it in a warm spot so it becomes bubbly and doubles in size. The success of your Chocolate Sourdough Bread: An Insanely Good Weekend Treat Recipe really hinges on how lively your starter is, so don’t rush—this is where patience pays off in the most delicious way.
Step 2: Mix and Autolyse the Dough
In a large bowl, whisk together bread flour, cocoa powder, and sugar. Next, add your bubbly sourdough starter and warm water, mixing until the dough looks rough and shaggy but with no dry pockets. Let the dough rest, covered, for 30 to 45 minutes so the flour hydrates and gluten begins to develop, making it easier to work with later. This simple autolyse sets the foundation for that tender yet sturdy crumb.
Step 3: Add Salt and Flavor Boosters
Sprinkle fine sea salt evenly over the dough along with espresso powder, vanilla, or orange zest if you’re using them. Gently pinch and fold the dough to combine. The dough will be slightly sticky but should feel cohesive. This step is crucial because salt balances sweetness and brings out the nuanced chocolate flavors, while the espresso and vanilla or zest lift everything to a new level.
Step 4: Bulk Fermentation with Stretch and Fold
Instead of traditional kneading, you’ll build strength with a gentle stretch-and-fold technique. Over the course of 2 hours, perform 3 to 4 rounds of stretching and folding at 30-minute intervals, resting the dough in between. This encourages gluten development and builds that chewy texture. During the last round, gently fold in dark chocolate chunks and any optional nuts or dried fruit, ensuring even distribution without tearing the dough. Then, let the dough bulk ferment at room temperature until it rises by about 50 to 75% and jiggles slightly—typically 3 to 6 hours depending on your environment.
Step 5: Pre-Shape and Shape the Loaf
Lightly flour your workspace and turn out the dough. Using a bench scraper, tuck edges underneath to form a loose round and rest it for 15 to 20 minutes. Next, shape the dough into a smooth, taut boule or oval batard by folding and rolling, creating surface tension that supports oven spring. This shaping step is where your loaf begins turning into a work of art, ready for that signature rise.
Step 6: Final Proof and Overnight Cold Retard
Flour your proofing basket generously, then place the dough seam-side up inside. Let it proof at room temperature for 30–60 minutes until it just begins to puff, then cover tightly and refrigerate overnight for 8 to 16 hours. This slow, cold proof develops complex, tangy flavors and improves the crust and crumb texture, making this Chocolate Sourdough Bread: An Insanely Good Weekend Treat Recipe truly stand out.
Step 7: Preheat Oven and Bake
About 45 minutes before baking, preheat your oven with a Dutch oven inside at 230–250°C (450–480°F). This ensures a hot vessel for perfect crust development. Transfer the chilled dough seam-side down onto parchment, score the top with a sharp blade to guide its expansion, then cover and bake for 20 to 25 minutes. Remove the lid and continue baking for 15 to 25 minutes until the crust is deeply browned and the loaf sounds hollow when tapped. The final internal temperature should reach about 96–98°C (205–208°F) for perfect doneness.
Step 8: Cool Completely Before Slicing
Patience here is key. Let your loaf cool on a rack for at least 1 to 2 hours. Slicing too soon can lead to a gummy crumb, especially with the moist chocolate elements. Once cooled, enjoy a beautifully chewy, chocolate-studded crumb with a crisp crust that truly makes this Chocolate Sourdough Bread: An Insanely Good Weekend Treat Recipe feel worth every minute of anticipation.
How to Serve Chocolate Sourdough Bread: An Insanely Good Weekend Treat Recipe
Garnishes
A simple pat of salted butter or a drizzle of honey highlights the chocolatey richness without overpowering it. You can also dust slices lightly with powdered sugar or a hint of cinnamon for a cozy finishing touch that complements the bread’s natural tang and sweetness.
Side Dishes
This bread pairs wonderfully with creamy spreads like mascarpone or nut butters. For a luxurious breakfast, serve alongside fresh berries and a cup of your favorite coffee or tea. It also makes an indulgent base for a rustic chocolate bread pudding or French toast.
Creative Ways to Present
Slice thick toasts and top with fig jam and crumbled nuts for a brunch-worthy treat. Or use it to create chocolatey grilled cheese sandwiches for a playful savory-sweet twist. Presenting this bread on a wooden board with some dark chocolate chunks and fresh fruit will impress guests and elevate any table.
Make Ahead and Storage
Storing Leftovers
Wrap leftover slices tightly in plastic wrap or store in an airtight container to maintain freshness. Keep at room temperature for up to 3 days; beyond that, the crumb may begin to dry but can still be revived with gentle reheating.
Freezing
This chocolate sourdough freezes beautifully. Slice before freezing so you can toast individual pieces as needed. Wrap slices in parchment and seal in freezer bags to avoid freezer burn. Frozen bread stays fresh for up to 3 months.
Reheating
To bring back that fresh-baked magic, toast slices directly or warm the whole loaf wrapped in foil at 160°C (320°F) for 10 to 15 minutes. This revives the crust’s crispness and makes the melty chocolate pockets ooze invitingly once again.
FAQs
Can I use a different type of flour for this recipe?
While you can experiment, high-protein bread flour is recommended to provide the necessary gluten structure to support cocoa and chocolate chunks. Using all-purpose flour may result in a denser loaf with less chew.
What if I don’t have espresso powder? Will my bread still taste good?
Absolutely! Espresso powder is optional and simply deepens the chocolate flavor without making it taste like coffee. If you don’t have it, you can skip it and your bread will still be deliciously chocolatey.
How important is the cold overnight proof?
The overnight cold retard is what transforms this bread from good to spectacular by developing complex flavors and improving crust and crumb texture. If you’re short on time, a shorter room temperature proof will still work but with a milder flavor profile.
Can I add other mix-ins besides chocolate and nuts?
Yes! Dried fruits like cherries or cranberries add delightful bursts of sweetness, and seeds can bring extra texture. Just fold them in gently during the last stretch-and-fold to avoid overworking the dough.
Why does the recipe recommend cooling the bread completely before slicing?
This step is crucial because cutting into warm sourdough can compress the crumb, making it gummy and dense. Allowing it to cool lets the crumb set properly so each slice has that perfect chewy texture balanced with melty chocolate patches.
Final Thoughts
Making this Chocolate Sourdough Bread: An Insanely Good Weekend Treat Recipe is not just about baking—it’s about creating an experience that fills your kitchen with warmth, aroma, and love. Whether you’re new to sourdough or a seasoned bread baker, this recipe brings a playful and indulgent twist to traditional bread that’s sure to become a favorite. So grab your starter, gather your ingredients, and get ready to treat yourself to something truly special this weekend!
Print
Chocolate Sourdough Bread: An Insanely Good Weekend Treat Recipe
- Prep Time: 45 minutes (active prep excluding starter refresh and fermentation)
- Cook Time: 45-50 minutes
- Total Time: 16 hours (including overnight retarding and fermentation)
- Yield: 1 large loaf, about 12 servings
- Category: Bread
- Method: Baking
- Cuisine: Artisan / Bakery Style
Description
Indulge in the rich, deeply chocolatey flavor of this Chocolate Sourdough Bread, an artisan-style loaf that transforms your weekend baking into a decadent treat. Combining the tangy complexity of naturally leavened sourdough with the indulgent notes of cocoa, dark chocolate chunks, and subtle hints of espresso and vanilla, this bread offers a chewy crumb with pockets of melted chocolate and a crisp crust. Perfectly balanced sweetness and flavor depth make it a standout loaf for breakfast, dessert, or anytime you crave a gourmet bread experience.
Ingredients
Starter and Dough
- Active bubbly sourdough starter – 150g (recently fed and at peak activity)
- High-protein bread flour – 500g
- Unsweetened cocoa powder – 40g
- Warm water (about 30-35°C / 86-95°F) – 350ml
- Fine sea salt – 10g
- Brown sugar or granulated sugar – 20g
- Espresso powder – 1 teaspoon
- Vanilla extract – 1 teaspoon (or zest of 1 orange)
Mix-ins (optional)
- Dark chocolate chips or chunks – 150g
- Chopped hazelnuts or nuts/dried fruit – 50g
Instructions
- Feed Your Sourdough Starter: Refresh your starter 4 to 8 hours before mixing the dough. Keep it in a warm place until doubled in size, bubbly, and passes the float test to ensure it’s active and ready.
- Mix and Autolyse the Dough: In a large bowl, whisk together bread flour, cocoa powder, and sugar. Add the active starter and warm water. Mix by hand or using a dough whisk until no dry flour remains. The dough will be rough and shaggy. Cover and let it rest for 30–45 minutes to hydrate the flour and begin gluten development.
- Add Salt and Flavor Boosters: Sprinkle fine sea salt evenly over the dough along with espresso powder and vanilla extract or orange zest. Gently pinch and fold the dough until combined. The dough should feel slightly sticky but cohesive; if too dry, wet your hand and incorporate a little water.
- Bulk Fermentation with Stretch and Fold: Cover the bowl and let the dough rest for 30 minutes. With damp hands, stretch one side of the dough and fold it over the center. Rotate the bowl and repeat stretching and folding all around. Perform 3–4 stretch and fold sessions spaced 30 minutes apart during the first 2 hours. Then, allow the dough to ferment at room temperature until it rises 50–75%, feels airy, and jiggles slightly (3–6 hours). During the last fold, gently incorporate chocolate chips and any nuts or dried fruit.
- Pre-Shape and Shape the Loaf: Lightly flour your work surface and gently turn out the dough. Use a bench scraper to fold edges under creating a loose round. Rest for 15–20 minutes. Shape the dough into a tight boule or oval by stretching into a rectangle, folding thirds, and rolling or tightening the surface to create tension for good oven spring.
- Final Proof and Overnight Cold Retard: Flour a proofing basket or line a bowl with a floured towel. Place shaped dough seam-side up. Let proof at room temperature for 30–60 minutes until slightly puffed. Then cover and refrigerate overnight (8–16 hours) for a slow cold proof that enhances flavor and improves scoring.
- Preheat the Oven and Dutch Oven: Place a Dutch oven with lid inside and preheat oven to 230–250°C (450–480°F) for 30–45 minutes until very hot for optimal crust and oven spring.
- Score and Bake: Remove hot Dutch oven carefully, line with parchment. Invert chilled dough seam-side down onto parchment. Score the top with a lame or sharp knife to guide expansion and add rustic design. Cover and bake 20–25 minutes, then remove lid and bake additional 15–25 minutes until crust is deeply browned and loaf sounds hollow when tapped. Internal temperature should be 96–98°C (205–208°F).
- Cool Completely Before Slicing: Transfer to a wire rack and cool for 1–2 hours before slicing. Cooling prevents gummy crumb and preserves the bread’s structure and texture. Enjoy your soft, chewy, chocolate-infused sourdough loaf with a crisp crust and pockets of melted chocolate.
Notes
- Use a kitchen scale for precise measurements, especially for flour and starter.
- Ensure your sourdough starter is at its peak bubble activity for best rise.
- Choose high-quality natural or Dutch-processed cocoa for richer chocolate flavor.
- Adjust sugar amount slightly to suit your sweetness preference, but keep it low to retain bread character.
- Overnight cold retard enhances flavor complexity and makes scoring easier.
- Do not slice the bread while warm to avoid gummy texture.
- Store leftover bread in a paper bag to maintain crust integrity.


